【AWS】SSO経由でCodeCommitに接続する方法
やりたいこと
IAMユーザーを使ったアクセスキーでCodeCommitを使うと、
永久に使えるためセキュリティ的によろしくないので、
IAM Identity Centerを利用し、SSO経由でCodeCommitを使いたいと思いました。
前提
いろいろ前提が多いですが、下記を前提として話を進めます。
- CodeCommitが操作可能なAWSアカウントを作成済み
- CodeCommitでリポジトリを作成済み
- ローカルPCにGitをインストール済み
- ローカルPCにPythonをインストール済み
- ローカルPCにAWS CLIをインストール済み
そこまでバージョンは厳しくないと思いますが、
Pythonのバージョンは3系以上をおすすめします。
AWS CLIのバージョンは2.9以上をおすすめします。
セットアップ手順(初回作業)
初回だけの手順のため、すでに終わっている作業がある場合は、飛ばしても問題ないです。
GRCインストール
pip3 install git-remote-codecommit
Pythonで「git-remote-codecommit」をインストールします。
pip install git-remote-codecommit
ローカルPCのターミナルでコマンドを実行します。
※今回はpython3のためpip3コマンドですが、バージョン2以下の場合pipコマンドで代用します。
実行してみて、下記結果が出力されればインストール完了です。
Successfully built git-remote-codecommit
AWS認証情報の設定
CodeCommitへ接続するための認証情報の設定を行います。
aws configure sso
ローカルPCのターミナルでコマンドを実行します。
SSO session name (Recommended): sso
SSOセッションとして、お好きな名前を入力してください。
SSO start URL [None]: https://d-123456789a.awsapps.com/start/#
AWSのスタートURLを入力してください。
SSO region [None]: ap-northeast-1
リージョンを入力してください。
SSO registration scopes [sso:account:access]:
入力なしでエンターを押してください。
Attempting to automatically open the SSO authorization page in your default browser.

If the browser does not open or you wish to use a different device to authorize
this request, open the following URL:

https://device.sso.ap-northeast-1.amazonaws.com/

Then enter the code:

CPXC-QCVL
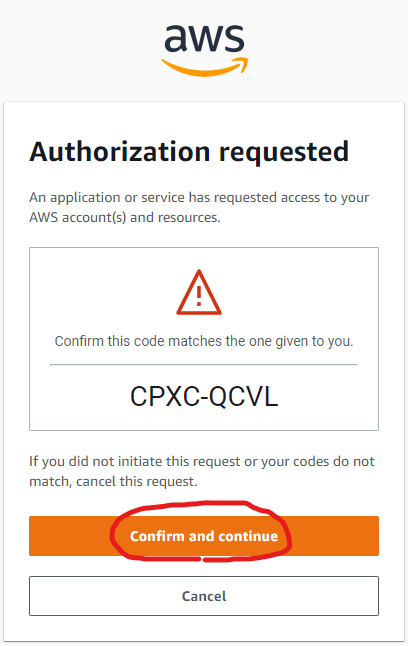
自動でブラウザが開きます。
同じコードが表示されていることを確認してください。
 「Confirm and continue」をクリックします。
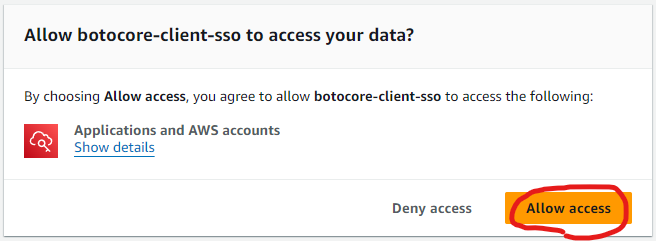
 「Allow access」をクリックします。
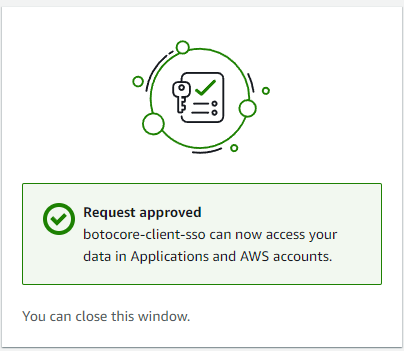
 この画面が表示されたら、先ほどのターミナルへ戻ります。
※ブラウザは閉じても大丈夫です。
ご自身のAWSアカウント一覧が表示されます。
There are 2 AWS accounts available to you.
WorkloadTest, test@example.com (111111111111)
> WorkloadCodeCommit, codecommit@example.com (222222222222)
Using the account ID 222222222222
Gitリポジトリがあるアカウントを、上下キーで選択しエンターを押してください。
※1アカウントしかなければ、選択は省略されます。
There are 2 roles available to you.
AdministratorAccess
> CodeCommitAccess
Using the role name "CodeCommitAccess"
選択されたアカウントに紐づいている、許可セット一覧が表示されますので
CodeCommitの操作の権限があるロールを選択してください。
※1つしかなければ、選択は省略されます。
CLI default client Region [None]: ap-northeast-1
リージョンを入力してください。
CLI default output format [None]:
入力なしでエンターを押してください。
CLI profile name [CodeCommitAccess-222222222222]: CodeCommit
プロファイル名として、お好きな名前を入力してください。
※今後よく使用するので、覚えやすい名前を推奨します
To use this profile, specify the profile name
using --profile, as shown:

aws s3 ls --profile CodeCommit
これで設定完了です。
Git設定
Gitのリモートリポジトリへ接続する際に、AWSの資格情報を使用するように設定します。
credential.helper
git config --global credential."https://git-codecommit.リージョン.amazonaws.com".helper "!aws --profile プロファイル名 codecommit credential-helper $@"
例)git config --global credential."https://git-codecommit.ap-northeast-1.amazonaws.com".helper "!aws --profile CodeCommit codecommit credential-helper $@"
リージョンは適宜変更し、ヘルパーを設定します。
credential.UseHttpPath
git config --global credential."https://git-codecommit.リージョン.amazonaws.com".UseHttpPath true
例)git config --global credential."https://git-codecommit.ap-northeast-1.amazonaws.com".UseHttpPath true
HTTPパスを設定します。
リージョンは適宜変更し、プロファイル名は「AWS認証情報の設定」でつけた名前にしてください。
GitリモートリポジトリのClone
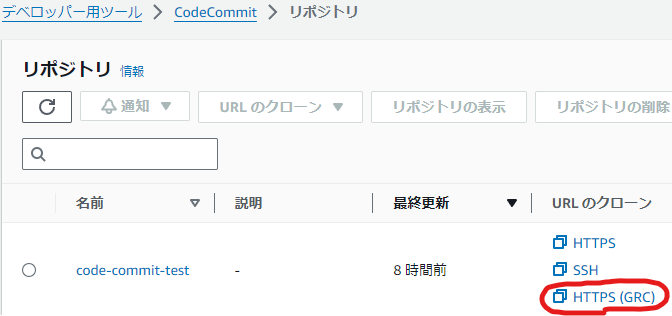
 AWSのCodeCommitで「HTTPS(GRC)」をクリックします。
codecommit::ap-northeast-1://リポジトリ名

例)codecommit::ap-northeast-1://code-commit-test
そうすると、こういう文字列がコピーされます。
codecommit::ap-northeast-1://プロファイル名@リポジトリ名

例)codecommit::ap-northeast-1://CodeCommit@code-commit-test
その文字列にAWS認証情報の設定でつけた、プロファイル名を追記します。
git clone codecommit::ap-northeast-1://CodeCommit@code-commit-test
これをリポジトリURLとして通常通りコマンドや、ご自身のGitクライアントツールでCloneできます。
SSOログイン
SSOは一時的な認証のため、時間経過で接続できなくなります。
SSOログインを行い、トークンの更新を行います。
aws sso login --profile プロファイル名
例)aws sso login --profile CodeCommit
プロファイル名は「AWS認証情報の設定」でつけた名前にして、ログインします。
Attempting to automatically open the SSO
authorization page in your default browser.
If the browser does not open or you wish to use a different device to authorize
this request, open the following URL:

https://device.sso.ap-northeast-1.amazonaws.com/

Then enter the code:

CPXC-QCVL
自動でブラウザが開きます。
同じコードが表示されていることを確認してください。
 「Confirm and continue」をクリックします。
 「Allow access」をクリックします。
 これでSSOログイン完了です。
再びCodeCommitの操作が可能です。
まとめ
AWSのCodeCommitをSSO経由で使ってみました。
個人で使う際にも仕事で使う際も、セキュリティは大事ですからね。
全然SSO経由の記事がないので、試して書いてみました。
以上、ここまで見ていただきありがとうございます。
皆さまの快適な開発ライフに、ほんの少しでもお役に立てれば幸いです。
