【Synology】AWSのRoute53をDDNSのプロバイダとして使う方法
やりたいこと
SynologyのDDNSを、AWSのRoute53に設定したい。
AWSでメンテナンス画面を作ってみたかったので、
SynologyのDDNSのプロバイダとして、Route53を設定する手順です。
前提
AWSの環境については、あまり詳しく説明はしません。
また、Route53は作成済みの前提でお話します。
Route53の作成は下記記事で紹介しています。
AWSのLambdaを作成
まずは、IPアドレスを更新するためのLambdaを作成します。
Lambdaは下記の状態です。
- Node.js 20.x
- 関数URLを有効化
IAMポリシー
IAMポリシーはLambdaの基本的な「AWSLambdaBasicExecutionRole」のほかに、
下記のActionを追加で許可してください。
"Action": [
  "route53:ChangeResourceRecordSets",
  "route53:UpdateHealthCheck"
]
下記はSSMパラメータストアを使う場合のみ必要です。
"Action": [
  "kms:Decrypt",
  "ssm:GetParameter"
]
リクエストを取得
リクエストをチェック
ユーザー名とパスワードをいろいろ判定します。
リクエストはeventのqueryStringParametersに入っています。
const query = event.queryStringParameters;

const userName = "正しいユーザー名";
const password = "正しいパスワード";

if (!query?.username) {
  console.log("ユーザー名が空です");
  return {
    statusCode: 403,
    body: JSON.stringify({Message: null}),
  };
}
if (!query?.password) {
  console.log("パスワードが空です");
  return {
    statusCode: 403,
    body: JSON.stringify({Message: null}),
  };
}
if (query.username.length !== 10) {
  console.log("ユーザー名の桁が不正です");
  return {
    statusCode: 403,
    body: JSON.stringify({Message: null}),
  };
}
if (query.password.length !== 30) {
  console.log("パスワードの桁が不正です");
  return {
    statusCode: 403,
    body: JSON.stringify({Message: null}),
  };
}
if (query.username !== userName) {
  console.log("ユーザー名が不正です");
  return {
    statusCode: 403,
    body: JSON.stringify({Message: null}),
  };
}
if (query.password !== password) {
  console.log("パスワードが不正です");
  return {
    statusCode: 403,
    body: JSON.stringify({Message: null}),
  };
}
Aレコードを更新
await route53Client.send(
  new ChangeResourceRecordSetsCommand({
    HostedZoneId: hostZoneId,
    ChangeBatch: {
      Changes: [
        {
          Action: "UPSERT",
          ResourceRecordSet: {
            Name: query.hostname,
            Type: "A",
            SetIdentifier: "primary.inkblogdb.com",
            Failover: "PRIMARY",
            TTL: 60,
            ResourceRecords: [
              {
                Value: query.ip,
              },
            ],
            HealthCheckId: healthCheckId,
          },
        },
      ],
    },
  }),
);
ヘルスチェックIPアドレスを更新
await route53Client.send(
  new UpdateHealthCheckCommand({
    HealthCheckId: healthCheckId,
    IPAddress: query.ip,
  }),
);
全貌
今回セキュアな情報は、SSMパラメータストアに保存しています。
また不正時のレスポンスは、Lambdaが存在しない時と同じレスポンスにしています。
各自適切なレスポンスにしたければ、変更してください。
import {
  ChangeResourceRecordSetsCommand,
  Route53Client,
  UpdateHealthCheckCommand,
} from "@aws-sdk/client-route-53";
import {GetParameterCommand, SSMClient} from "@aws-sdk/client-ssm";

export const handler = async (event, context, callback) => {
// 環境変数取得
  const hostZoneId = process.env.HOST_ZONE_ID;
  const healthCheckId = process.env.HEALTH_CHECK_ID;
  const ssmParameterPathUserName = process.env.SSM_PARAMETER_PATH_USER_NAME;
  const ssmParameterPathPassword = process.env.SSM_PARAMETER_PATH_PASSWORD;

// URLパラメーター取得
  const query = event.queryStringParameters;

// リクエストチェック
  if (!query?.username) {
    console.log("ユーザー名が空です");
    return {
      statusCode: 403,
      body: JSON.stringify({Message: null}),
    };
  }
  if (!query?.password) {
    console.log("パスワードが空です");
    return {
      statusCode: 403,
      body: JSON.stringify({Message: null}),
    };
  }
  if (query.username.length !== 10) {
    console.log("ユーザー名の桁が不正です");
    return {
      statusCode: 403,
      body: JSON.stringify({Message: null}),
    };
  }
  if (query.password.length !== 30) {
    console.log("パスワードの桁が不正です");
    return {
      statusCode: 403,
      body: JSON.stringify({Message: null}),
    };
  }

// SSMクライアント
  const ssmClient = new SSMClient();

// ユーザー名取得
  const userName = await ssmClient
    .send(
      new GetParameterCommand({
        Name: ssmParameterPathUserName,
        WithDecryption: true,
      }),
    )
    .then((response) => response.Parameter.Value);
// ユーザー名チェック
  if (query.username !== userName) {
    console.log("ユーザー名が不正です");
    return {
      statusCode: 403,
      body: JSON.stringify({Message: null}),
    };
  }

// パスワード取得
  const password = await ssmClient
    .send(
      new GetParameterCommand({
        Name: ssmParameterPathPassword,
        WithDecryption: true,
      }),
    )
    .then((response) => response.Parameter.Value);
// パスワードチェック
  if (query.password !== password) {
    console.log("パスワードが不正です");
    return {
      statusCode: 403,
      body: JSON.stringify({Message: null}),
    };
  }

// Route53クライアント
  const route53Client = new Route53Client();

  try {
// Route53のAレコード更新
    await route53Client.send(
      new ChangeResourceRecordSetsCommand({
        HostedZoneId: hostZoneId,
        ChangeBatch: {
          Changes: [
            {
              Action: "UPSERT",
              ResourceRecordSet: {
                Name: query.hostname,
                Type: "A",
                SetIdentifier: "primary.inkblogdb.com",
                Failover: "PRIMARY",
                TTL: 60,
                ResourceRecords: [
                  {
                    Value: query.ip,
                  },
                ],
                HealthCheckId: healthCheckId,
              },
            },
          ],
        },
      }),
    );
  } catch (e) {
    console.log("Aレコード更新に失敗しました");
    console.error(e);
    return {
      statusCode: 403,
      body: JSON.stringify({Message: null}),
    };
  }

  try {
// ヘルスチェックのIPアドレス更新
    await route53Client.send(
      new UpdateHealthCheckCommand({
        HealthCheckId: healthCheckId,
        IPAddress: query.ip,
      }),
    );
  } catch (e) {
    console.log("ヘルスチェック更新に失敗しました");
    console.error(e);
    return {
      statusCode: 403,
      body: JSON.stringify({Message: null}),
    };
  }

  console.log("IPアドレスを更新しました");
};
Synologyでカスタムプロバイダ設定
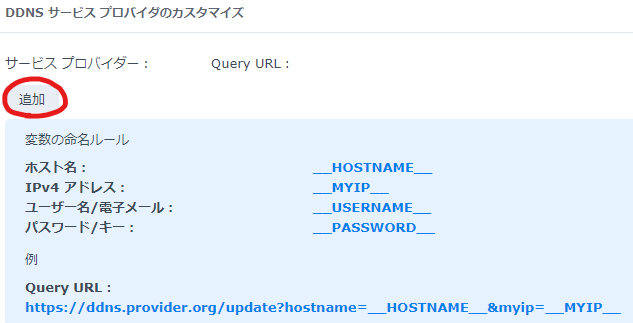
 コントロールパネルから外部アクセスをクリックします。
 DDNSタブのプロバイダのカスタマイズをクリックします。
 追加をクリックします。
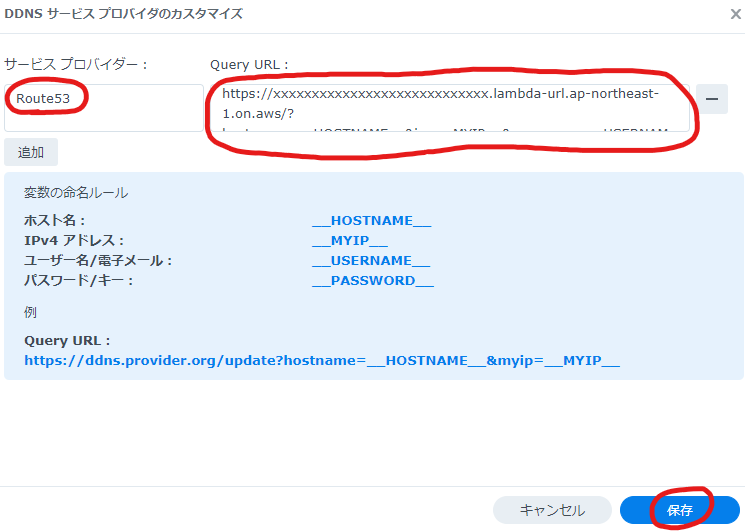
 サービスプロバイダ―に「Route53」、 Query URLにLambdaの関数URLと、後ろにパラメータを付与して保存をクリックします。
※画像だと見切れているので、下記のLambdaドメインを修正したものをご使用ください。
https://xxxxxxxxxxxxxxxxxxxxxxxxxxxx.lambda-url.ap-northeast-1.on.aws/?hostname=__HOSTNAME__&ip=__MYIP__&username=__USERNAME__&password=__PASSWORD__
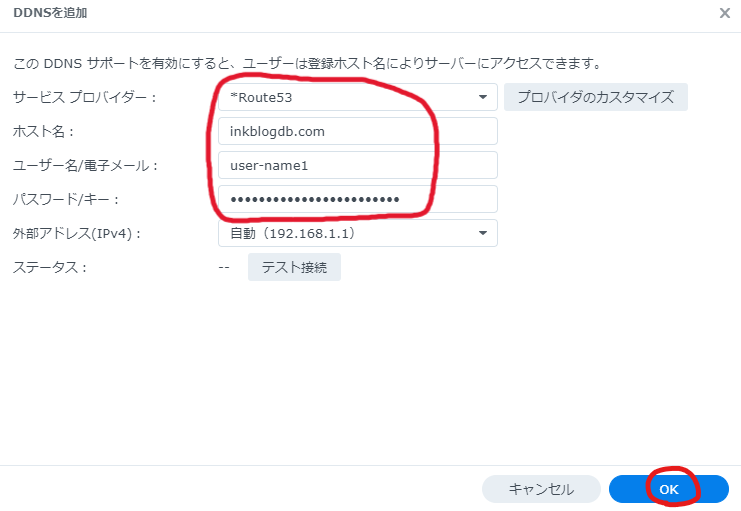
 追加をクリックします。
 サービスプロバイダーは先ほどのRoute53を選択、ホスト名は各自ホスト名を入力し、ユーザー名/電子メールと、パスワード/キーはLambdaで検証するユーザー名とパスワードを入力します。
テスト接続をして、問題なければOKをクリックします。
これで設定完了です。
まとめ
SynologyのDDNSにRoute53を設定してみました。
Lambda関数を公開することになるので、くれぐれもセキュリティには気を付けてください。
下手したら乗っ取られることになるので…
この記事には書いていないですが、ちゃんと通知されるような仕組みにしておきましょう。
以上、ここまで見ていただきありがとうございます。
皆さまの快適な開発ライフに、ほんの少しでもお役に立てれば幸いです。

